
Audio routing with PreSonus Studio
Challenges Using PreSonus Studio Interfaces with ASIO on Windows
Section titled “Challenges Using PreSonus Studio Interfaces with ASIO on Windows”1. Driver and Device Compatibility
Section titled “1. Driver and Device Compatibility”- PreSonus interfaces, like the Studio 1824c, require proprietary drivers for full functionality, particularly for low-latency ASIO performance.
- Windows systems often default to using WDM drivers or Microsoft’s generic USB audio class drivers, which don’t support full channel routing or multi-client access.
- Using multiple audio interfaces or virtual drivers simultaneously in Exaplay often leads to conflicts or non-functional routing.
2. Complex Channel Mapping
Section titled “2. Complex Channel Mapping”- The PreSonus Universal Control app provides routing for hardware outputs but requires manual configuration to avoid feedback loops or misrouted signals.
- Windows apps like Exaplay may list many channels without meaningful names, leading to trial-and-error setup unless ASIO4ALL is used to simplify visibility.
Configuring ASIO4ALL for VIOSO Exaplay
Section titled “ Configuring ASIO4ALL for VIOSO Exaplay”Preparation
Section titled “Preparation ”1. Install the PreSonus Driver
Section titled “1. Install the PreSonus Driver”- Download and install the latest driver from the official PreSonus product page:
PreSonus Downloads
2. Setup with ASIO4ALL
Section titled “2. Setup with ASIO4ALL”- Why ASIO4ALL?
ASIO4ALL allows you to selectively enable specific input/output channels from your audio device. This is helpful in Exaplay to avoid clutter from unused channels. - Steps:
-
Install ASIO4ALL (download from https://asio4all.org/)
-
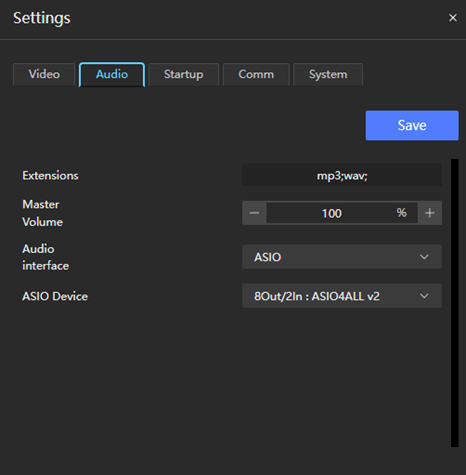
Open Exaplay, go to Settings, and select ASIO4ALL as the audio device.
-
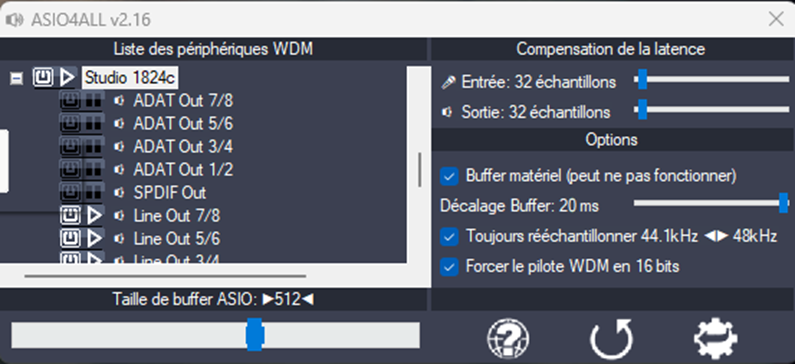
Click the wrench in the ASIO4ALL control panel to open advanced view.
-
Enable only the input/output channels you intend to use:
-
Back in Exaplay, verify that only those channels are visible.
-
3. Direct Use of PreSonus ASIO Driver (Optional)
Section titled “3. Direct Use of PreSonus ASIO Driver (Optional)”- If you prefer not to use ASIO4ALL, you can also select the PreSonus ASIO driver directly in Exaplay.
- All channels will be listed, which can be more overwhelming but offers full access.
Channel Assignment & Routing in Exaplay and PreSonus App
Section titled “Channel Assignment & Routing in Exaplay and PreSonus App”In Exaplay:
Section titled “In Exaplay:”- Assign the desired output channels per VIOSO use case (e.g., per projector or screen).
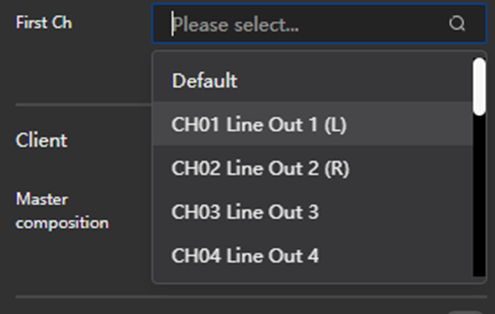
- These assignments appear as input channels inside the PreSonus driver’s DAW view (see below)
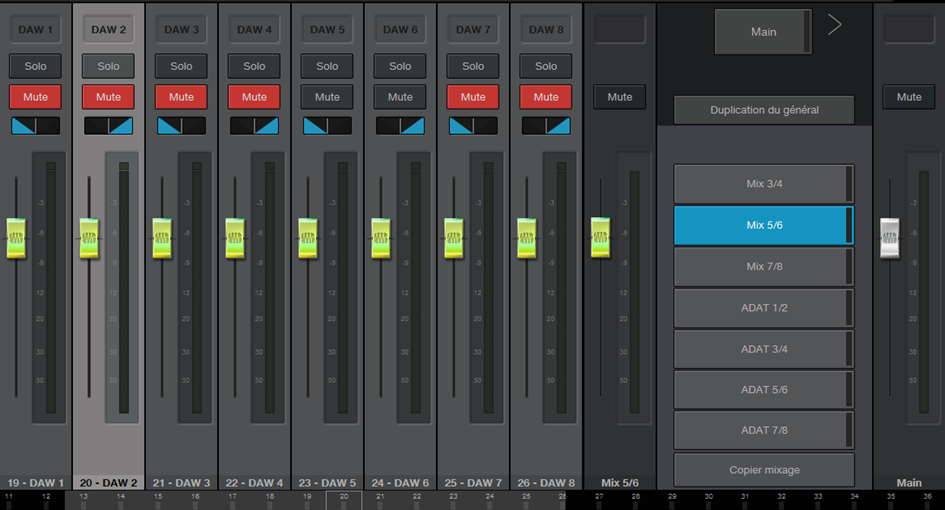
In PreSonus Universal Control:
Section titled “In PreSonus Universal Control:”- Go to the Mix Routing panel.
- By default, any signal routed to a DAW input will be heard on all line outputs.
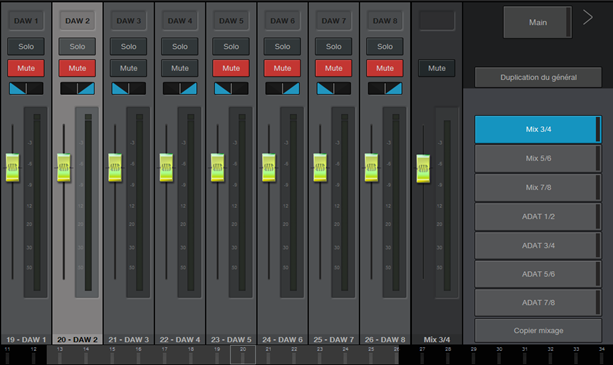
- You must:
- Select the desired MIX output (e.g., MIX 3/4),
- Mute all unwanted channels for that output.
- Repeat this for each mix output.
Summary
Section titled “Summary”| Component | Task |
|---|---|
| Driver | Install PreSonus official driver |
| ASIO4ALL | Use to simplify channel view in Exaplay |
| Exaplay | Select desired ASIO device, assign channels, save settings |
| PreSonus App | Route DAW channels to specific mix outputs and mute others |